How to make a do-it-yourself corn plow at home
Corn cobs do not last long. When harvesting is over, it is important to process them quickly. Handling large volumes of corn is a monotonous and tiring task. To save time and effort, you can make a do-it-yourself corn plow.
general description
You can make a do-it-yourself corn crusher using a drawing. Peeling machines are divided into 2 types:
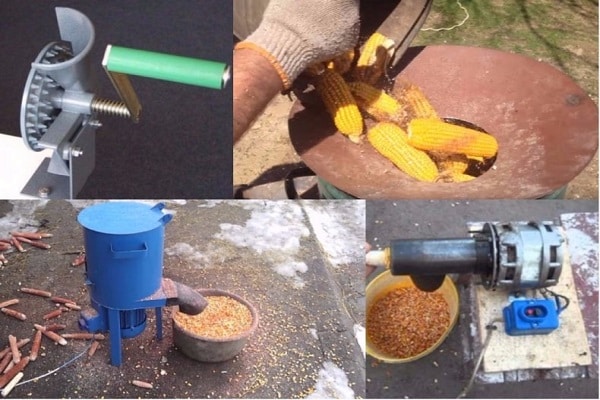
- Big. It is used on large farms. The shredder is designed for different sizes of corn. It is filled with buckets (from 8 kg) or bags. Cleaning time 3-5 minutes. For 1 hour of operation, the device processes 500 kg of crop.
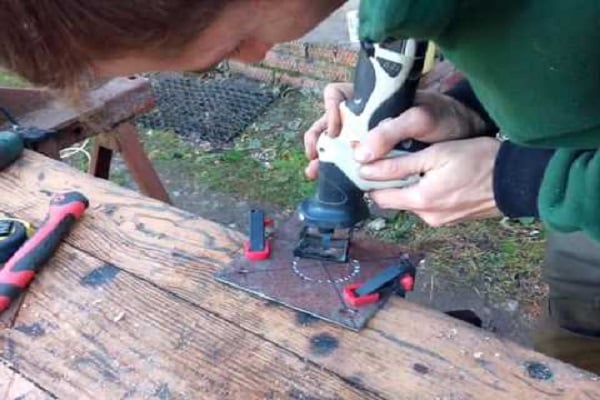
- Small. Designed for use at home for peeling one ear. It is inserted into the hole of the device, and the entire peeling process is held by hand. The motor of a small cultivator burns out when a lot of work is done.
The electromechanical unit has 2 holes: the first hole is filled with corn or inserted, the second is the refined grain comes out. The bare ears are unloaded from the drum. They are taken out by hand. Some types of devices simplify work: they push the empty ears away from the grain.

A corn husker is an easy tool to manufacture, however, you need to select the size of parts corresponding to the amount of harvest.
Principle of operation
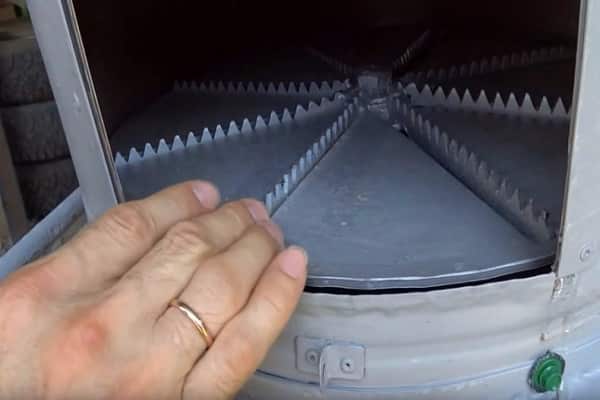
The mains-powered motor is present in all types of units. Let's see how to peel corn at home with a large stubble plow. It is equipped with a disc; its teeth are not sharp and have a roundish shape. The height of these teeth varies from 6 to 8 mm. The disc itself resembles a sieve in appearance due to the large number of round holes for grain.
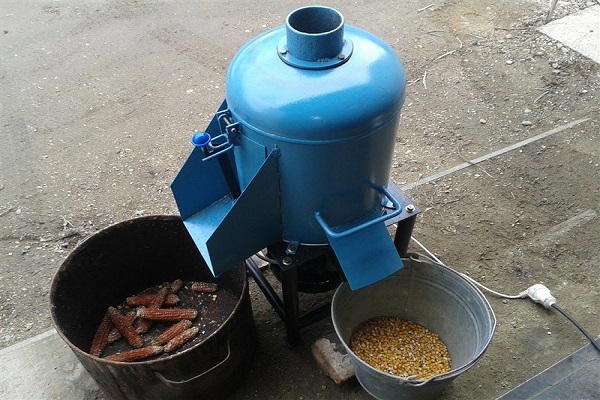
The body of the device should be closed with a flap, thus, the crop will not scatter to the sides. There are designs with a cob tray attached to the body. The cover for cleaning the device is at the bottom. This model helps to significantly save time: the first batch is processed in the case, and the second is waiting for its time in the tray.

After placing the crop, the motor rotates the disk (more than 45 revolutions per minute). The corn is pressed down by its mass, beats and clings to the teeth. Grain begins to pour into the holes of the disc and the gap between the cylinder and the disc, from where it flies into the lower section of the device. There is no acceleration, so the finished product is poured through the chute into a prepared container or onto the ground. Light cobs are pushed up by heavy cobs. If the grains have stopped spilling out, it's time to throw away the waste and load a new batch.
The principle of operation of small type devices is the same, however, there are differences in the design of the device. A toothed pipe is attached to the rotating disc.Due to the fact that the teeth are directed inward, the grains cling to them well, and then fall into the container. An empty ear does not fall anywhere, it remains in the hands of the owner. The cleaning element of the large apparatus is horizontal, and of the small one - vertically.
How to make?
For the manufacture of a do-it-yourself corn plow it is important:
- Use of durable materials, parts.
- Choosing the right amount of fixture.
- Detailed, step-by-step instructions.
To create an electric corn stalker, prepare:
- The base for the unit is made of durable material (aluminum, dense plastic).
- Cob reservoir. It may be an old, unnecessary thing (a bunker from a washing machine, a cylindrical container).
- Flap on the body.
- Disc with teeth.
- Toggle switch (switch).
- Scraper.
- Flange.
- Motor.
Construction begins with riveting the base and tank. The grain breaker is connected to the tray flap. A toggle switch on a magnetic starter is installed on the tank wall. Holes are drilled in the disc with a drill (no more than 14 mm), teeth are welded, semicircular for a farm or sharp for small volumes of harvest.
The tray has 2 holes: one for grain and the other for empty ears. Two 2 cm plates are attached to the bottom of the chamber. They are needed to support the rubber squeegee. Its task is to direct the corn cobs from one side to the other. The flange is attached to the motor shaft.

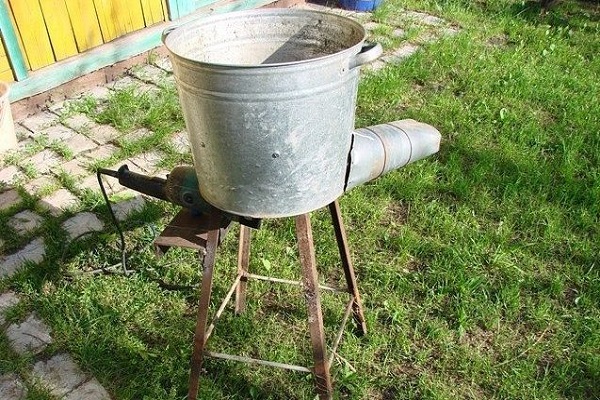
Self-made Corn Shelter
The diagram of the drawing of a corn plow provides a base - this is a cylindrical aluminum pipe from a watering system, connected by rivets. It is bolted to the base of the device. The grain separator is riveted to the chute guard. The toggle switch is attached to the side wall of the cylinder. The disc is equipped with semicircular teeth. To increase the rigidity of the disc, a 6 * 35 mm tire is welded.
Plates 2.5 cm are welded perpendicular to the disc. A rubberized scraper strip is bolted to the plates. The bottom of the hopper is equipped with a tire, the cylinder is screwed to it with bolts. There is a flange on the shaft of the electric motor, a disk is attached to it. There are 3 leading fonts on the flange end. The rotation of the toothed disk is counterclockwise. This facilitates self-screwing of the bolt and makes it easier for the empty ears to exit through the door, which closes during peeling.